You have hours of landscape footage — a podcast, an interview, a livestream replay. You want a 9:16 vertical clip for Reels, TikTok, or Shorts. The hard part is not the cropping itself; it is keeping the crop on whoever is speaking. Manually that is twenty minutes of scrubbing, dragging a window, and re-rendering for every clip. Automatically, it has to know who is talking and follow them frame by frame.
PodSplit does that. Give it a YouTube URL, get a 9:16 clip back with the framing locked on the active speaker, captions burned in, the whole thing rendered unattended. It uses a real ML pipeline — audio-visual active speaker detection, speaker diarization, word-level transcription — and an engineering chassis that turns those signals into a smooth crop the eye reads as intentional.
See it in action
For the full picture, here is a side-by-side before / after compare — the original 16:9 source on the left, the auto-reframed 9:16 on the right, single play head controls both. That is what the framing engine actually decided to do, frame by frame, on a five-minute clip.
The rest of this article is how it works under the hood: which problems are AI, which problems are not, and what the engineering chassis around the models had to do to make the output feel deliberate.
Three-Tier Topology
The architecture splits across three logical planes. The cloud tier handles auth, job state, and the public API. A GPU workstation on-prem runs all the ML and ffmpeg work. Browser clients talk to the cloud tier; video bytes never transit the cloud tier at all.

The separation has a practical payoff: the cloud VPS egress bill is essentially zero even on long sessions. When the browser plays a clip preview, it streams directly from the GPU host over a dedicated media tunnel, authenticated by a short-lived HMAC-signed URL minted by the cloud API. The cloud tier knows who you are; the GPU tier validates that signed URL on every range request and serves the file. They never need to coordinate on video bytes.
Job state lives in SQLite on the VPS: users, jobs, clips, crop edits, speaker labels. ML output lives as flat JSON files in a per-job working directory on the GPU host: transcript, diarization annotations, face tracks. Clean split: the VPS is the source of truth for what a job is; the GPU host is the source of truth for what it produced.
The Pipeline
Submit a URL, get a job ID back. From that point forward the GPU worker runs the pipeline as a sequence of stages and broadcasts progress events over a WebSocket back to the cloud tier, which re-emits them to any connected browser.

The stages in order:
- Download via yt-dlp, writing the source video to the GPU host working directory.
- Proxy via ffmpeg: 720p H.264 for browser preview, 16 kHz mono WAV for the ML stages.
- Diarize: pyannote.audio 4.x produces per-second speaker turn annotations.
- Face detect: OpenCV YuNet, sampled at roughly 1 frame per second from the proxy. Podcast framing is nearly static, so 1 Hz buys a 5x wall-time reduction with no perceptible crop drift downstream. An IoU tracker links per-frame detections into stable face tracks across time.
- Active speaker detection: an audio-visual ASD model (LR-ASD, IJCV 2025) takes the audio waveform and each tracked face's image sequence, and returns a per-frame speaking probability per face. The proxy is re-decoded at 25 fps inside this stage so the face-crop sequences match the ratio the model was trained at.
- Transcribe: WhisperX with word-level alignment, CUDA-accelerated via PyTorch.
- Highlights: a local LLM reads the transcript and returns N clip windows with titles and summaries.
- Crop schedule: per-clip static window for highlights; per-frame Gaussian-smoothed schedule for full reframes. Both modes pull samples from the active-speaker output when it is available, falling back to largest-face when it is not.
- Ready: editable state reached, the user gets the speaker rename panel and the clip list.
All ML outputs are persisted as JSON on the GPU host. If the pipeline restarts mid-job, each stage checks for its output artifact and skips itself if one is found. A job that dies in the highlights stage resumes in seconds rather than re-running yt-dlp and pyannote from scratch.
Speaker-Aware Framing: The Hard Part
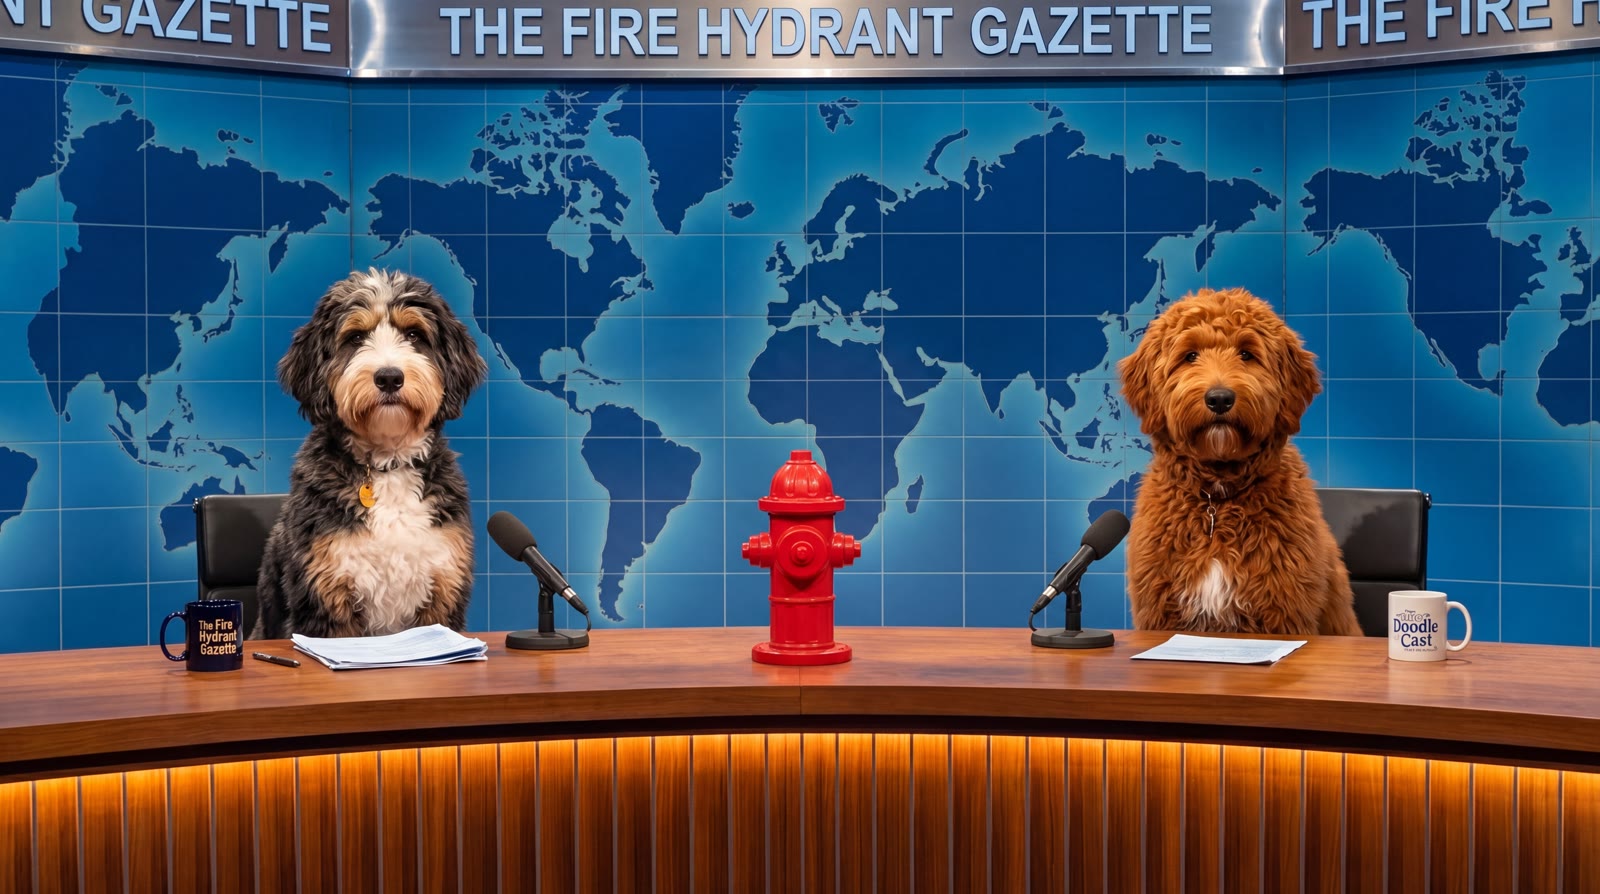
This is the feature that made the project worth building. A naive center-crop of a 16:9 podcast frames the gap between two chairs. Speaker-aware framing keeps the right head in center.
The geometry
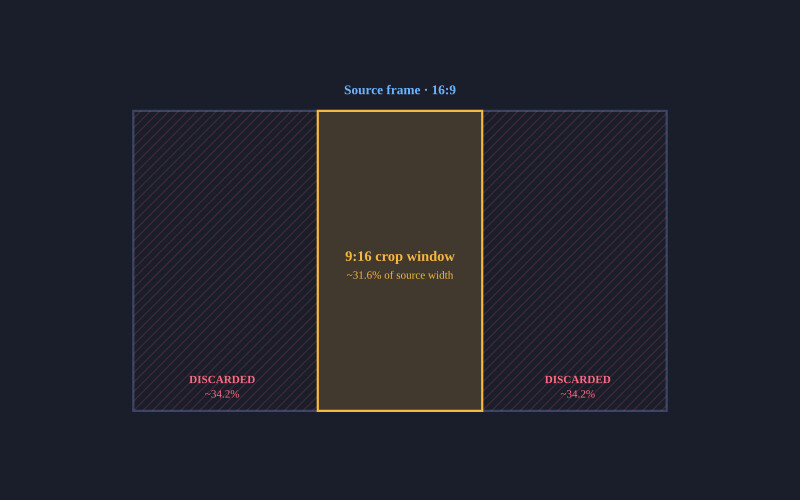
YouTube podcasts are 16:9. Vertical clips are 9:16. The 9:16 crop window is roughly 31.6% of the source width. Everything to the left and right of that window is discarded. For a typical interview shot, the speaker face occupies about 5 to 15 percent of source width and sits well off-center. The framing engine entire job is to move that window.

Picking the speaker face per moment
Face detection answers "where are the faces", not "which one is talking". For two-shot interviews where both faces are similar size in a tight medium shot, the obvious heuristic — pick the largest face — flips a coin. The active-speaker detection stage closes that gap. It runs an audio-visual model that takes the audio waveform and each tracked face's image sequence, and returns a per-frame speaking probability per face. At any moment the speaker is the track with the highest probability. Speaker switches show up as a clean handoff in the probability curves rather than a jitter the framing engine has to guess about.
The model is small — under a million parameters — and ships with pretrained weights that generalise across podcast framings without fine-tuning. Inference is a sub-step of the pipeline, not its bottleneck. When the model can't load or has no signal in a given window, the largest-face heuristic stays wired in as a fallback so the pipeline never breaks because of an ML failure.
Static crop for highlights
For LLM-picked highlight clips (typically 30 to 90 seconds), I compute face centers across all face samples in the clip window — the active-speaker face per moment when ASD output is available, the largest face per moment as a fallback — take the median of those normalized x-coordinates, and pin the 9:16 window there. The median is deliberate: a single bad detection frame (a poster on the wall, a coffee mug catching the light) becomes an outlier that the median ignores. The mean would yank the window sideways.
The crop origin is clamped so the window never slides past the source frame edges:
crop_x = clamp(median_center_x - crop_w / 2, 0, 1 - crop_w)
For short highlight clips this is exactly right. The speaker is usually in roughly the same position throughout, so a stable static window looks intentional.
Dynamic tracking for full reframes
For a 20-minute full-length reframe, a static crop fails badly. The host is on the left half of the frame; the guest is on the right. A single window frames one of them wrong the entire time.
For full-reframe mode I build a per-frame crop schedule instead. The process:
- Sample face centers at roughly 5 per second across the whole clip.
- Apply a 5-wide median filter to the raw samples to reject single-frame outliers.
- Detect speaker switches: a lateral jump of more than 15% of frame width in under 0.6 seconds signals a cut to a different speaker.
- Snap detected cuts to the nearest actual scene-change frame (via ffmpeg scene filter) within a 0.5-second window. This eliminates the few-frame wrong-person flicker you get if the crop change precedes the source cut by 80ms.
- Resample the schedule to the exact source framerate.
- Apply Catmull-Rom interpolation between sparse samples to fill the dense grid smoothly.
- Apply zero-phase Gaussian smoothing within each segment, not across cuts. Sigma is approximately 0.75 seconds.
- Convert smoothed centers to pixel crop X values and emit one sendcmd command per source frame, deduplicating when consecutive values round to the same pixel.
The output is a tightly compressed sendcmd script. A 20-minute reframe job typically emits about a thousand crop updates rather than the six thousand you would get from naively writing one per frame. The visual effect is a slow horizontal glide as a speaker leans, then a near-instantaneous snap when the conversation switches. Because the smoothing is segment-internal, the snap is preserved cleanly. If I smoothed across the cut, you would get half a second of wrong-speaker centering on either side of the switch, which feels worse than a hard cut.
The whole crop schedule then plugs into stock ffmpeg via the sendcmd filter. No custom binary, no patched build. The pipeline is just clever ffmpeg invocations.

Captions and Speaker Labels
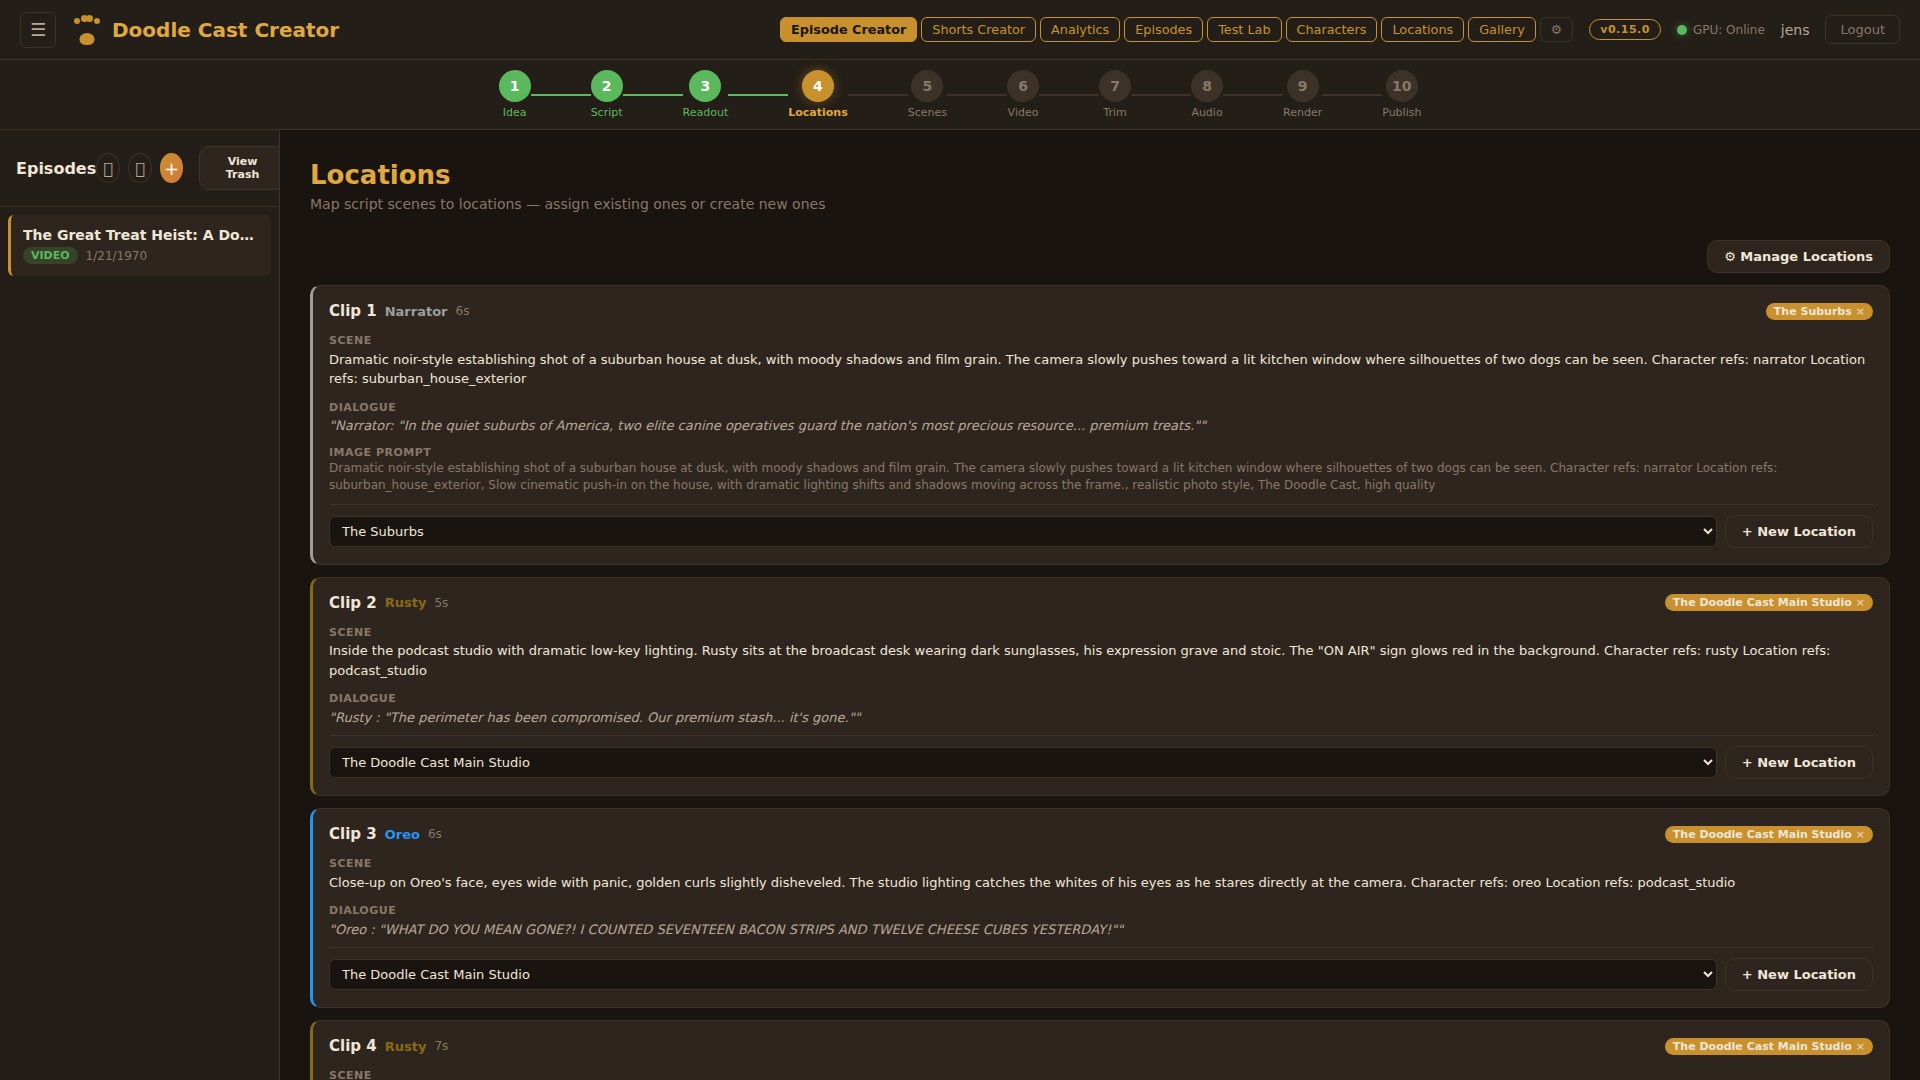
Subtitles are non-negotiable in vertical video. WhisperX gives me word-level timestamps, which I collapse into per-line ASS events sized to look right at 9:16. Each line carries a speaker tag derived from the diarization step: S00, S01, and so on. Those identifiers are useless to a viewer, so the editor lets the user rename them after the pipeline finishes. Default names (Speaker 1, Speaker 2) are pre-populated; the user types over them with real names like Rusty or Oreo, and a SQLite row binds the mapping per job.
Burn-in happens in the same ffmpeg invocation as the crop. The renamed speaker label sits as a small amber line above the spoken text. Its visual weight is deliberately quieter than the words. Strong line outline so the captions remain legible whether the cut behind them is a bright window or a dim podcast booth, plus a small watermark in a corner.
LLM Highlight Selection
Picking the right thirty-second moments out of a ninety-minute conversation is the second hard problem. A heuristic on transcript density alone (more words per second equals more interesting) catches loud disagreements and misses quiet revelations. I use a local LLM instead.
The default model is gemma3:12b running through llama-swap on the GPU host. I tested qwen3:32b and a few other reasoning-style models early on; the thinking-mode chains added thirty seconds or more to a single call, which cascades badly when you ask for ten highlight windows from a long episode. gemma3 returns clip windows in roughly two to four seconds with consistent JSON output. Honest tradeoff: it is sometimes less surgical about exact start times. The user can adjust clip ends in the editor anyway, so I accept the speed.
The prompt feeds the LLM a chunked transcript with timestamps and asks for N candidate clips with start, end, title, and summary. I parse the response with a multi-strategy fallback (direct JSON, regex extraction, bracket scanning) because no local model returns clean JSON every time. N is user-selectable from a dropdown: Auto, 1, 2, 3, 5, 7, 10, 15.
The Render Filter Chain
When the user hits export, I shell out to ffmpeg with a single filter graph that does the whole job in one pass:
[0:v]sendcmd=f=cmds.txt,crop=w:h:x:0,subtitles=subs.ass,overlay=watermark[v]
[0:a]anull[a]
The crop window comes from sendcmd; subtitles burn in via libass; the watermark overlays in a corner. NVENC handles the H.264 encode. For a 30-second highlight clip, render is roughly real time on the proxy resolution I keep on disk. For a 20-minute reframe, it scales linearly because the schedule is dense but cheap.

Storage Discipline
The cloud control plane never sees video bytes. The browser fetches a proxy preview directly from the GPU host through the secure tunnel, authenticated by a short-lived signed URL minted by the cloud API. Same path for the final clip download. Range requests work end to end, so seeking through a 90-minute proxy in the browser is responsive even though the file is on the GPU host across the tunnel.
On the GPU host, working directories are pruned on a daily schedule with a seven-day retention window. The pipeline writes manifests with relative paths so a job that gets garbage-collected can be regenerated from the source URL without re-discovering anything except the actual bytes.
The Hard Parts: Pyannote on Windows
Pyannote.audio 4.x assumes a Linux deployment. I wanted to run on the same Windows GPU host that already hosts other ML services so I did not have to build a second machine. That cost me about two evenings; here are the discoveries worth remembering.
- torchcodec is the new audio loader and has no Windows wheels. Pyannote calls it implicitly when you pass a file path. The bypass is to load the audio yourself with soundfile and pass
{"waveform": tensor, "sample_rate": sr}to the pipeline directly. Same result, runs everywhere torch runs. - The 4.x API renamed
use_auth_tokentotoken. Older tutorials use the old name. Try the new one first. - The 4.x return shape is
DiarizeOutput, notAnnotation. Iterating tracks now goes through.speaker_diarization, not the top-level object. Easy to miss; the error message just says "no itertracks" with no context. - speechbrain 1.1.0 calls a torchaudio function that was removed. It dies at import. I fixed it with a
sitecustomize.pyshim that monkey-patches the missing function before speechbrain loads. - Three Hugging Face models are gated, not two. The community-1 model is chained from the speaker-diarization-3.1 model in 4.x and is easy to miss until your first real run fails on it.
- Fine-grained Hugging Face tokens default to a more restrictive scope than classic Read tokens. I discovered this when my access kept failing after I accepted all three model gates. Switching to a classic Read token resolved it.
None of these are interesting in isolation. Stacked, they are why a five-minute Python install took a couple of evenings. Keeping the discoveries written down meant I did not relearn them on the next pipeline upgrade.
What Is Still Deferred
A few things on the roadmap, intentionally out of scope for the first iteration:
- Multi-keyframe scrubbing in the override modal. The current override is a single locked-aspect drag for one position. A future version will give the user a timeline scrubber with a per-keyframe override grid.

Discussion
Be the first to comment